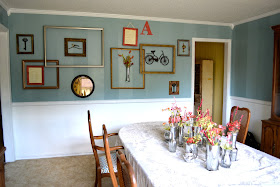
Here are the supplies I used:
- Old frames from thrift stores
- misc. decor items (smaller than the frames)
- nails
- optional: paint, finishing stain, sandpaper
Step 1) Find frames to hang. I got 5 or 6 at thrift stores for probably $5 and then refinished some of them to make them look vintage (painted them, sanded them down, used finishing stain to make it look old).
Step 2) Find objects you want to place inside the frames. I used wrought iron keys, clocks, poetry, misc. crafts I made.
Step 3) Decide where to hang the frames. Don't be too neat! It's meant to look hectic. I LOVE the look of the frames overlapping, dare you to try it!
To make the frames overlap just place your background frame where you want it and nail plush to the wall. Then position your foreground frame that you want to float and put nails in as well, but make sure you don't nail them in very far so the frame can be hung an inch or so off the wall (I had to get longer nails for the floating frames).
Step 4) After you have placed all your frames start filling with random stuff! I only bought a couple items and then just tried to grab stuff from around my house that I already owned.


No comments:
Post a Comment